
Rank Math Settings
– Focus Keyword: vape coils
– SEO Title: Vape Coils Explained: Complete Buying Guide (2026) | VapingParts
– Meta Description: Vape coils explained. Learn how coils work, compare Kanthal vs mesh vs ceramic, and find the right coil for your device in 2026.
– URL Slug: /vape-coils-guide/
– Schema Type: Article (HowTo secondary for priming section, FAQ for FAQ section)
– Cornerstone Content: Yes
– Canonical: https://vapingparts.com/vape-coils-guide/
– Primary Category: Guides
– Tags: vape coils, coil guide, mesh coils, sub-ohm coils, vape maintenance
Vape coils are the single most important replaceable part in any vaping device. They directly control flavor quality, vapor production, and how often you spend money on replacements. Whether you are brand new to vaping or looking to upgrade from stock coils to a rebuildable setup, this guide covers everything you need to know about choosing, using, and maintaining vape coils in 2026.
Disclosure: This article contains affiliate links. If you purchase through our links, we may earn a commission at no extra cost to you. This helps support our testing and editorial work. Read our full affiliate disclosure.
Below you will find a quick-reference comparison table, detailed breakdowns of every coil type on the market, step-by-step priming instructions, and a brand-by-brand price guide. Bookmark this page — it is the only coil resource you will need.
Table of Contents
1. Quick Comparison: Coil Types at a Glance
2. What Are Vape Coils and How Do They Work?
4. Mesh Coils vs Regular Coils
5. Pre-Built vs Rebuildable Coils
6. How to Choose the Right Coil for Your Device
7. Resistance Levels Explained: Sub-Ohm vs Above-Ohm
8. How to Prime a New Coil (Step by Step)
9. Signs Your Coil Needs Replacing
13. FAQ: Vape Coils
Quick Comparison: Coil Types at a Glance
| Coil Type | Best For | Resistance Range | Avg. Lifespan | Price per Coil | Flavor Rating |
|———–|———-|—————–|—————|—————-|—————|
| Kanthal (Round Wire) | Beginners, wattage mode | 0.15 – 3.0 ohm | 1 – 2 weeks | $2 – $4 | Good |
| NiChrome (Ni80) | Fast ramp-up, flavor chasers | 0.10 – 1.5 ohm | 1 – 2 weeks | $2 – $5 | Very Good |
| Stainless Steel (SS316L) | TC and wattage versatility | 0.10 – 2.0 ohm | 2 – 3 weeks | $3 – $5 | Excellent |
| Nickel (Ni200) | Temperature control only | 0.05 – 0.20 ohm | 1 – 2 weeks | $3 – $5 | Good |
| Ceramic | Longevity, clean flavor | 0.30 – 1.5 ohm | 3 – 4 weeks | $4 – $7 | Very Good |
| Mesh | Maximum flavor and vapor | 0.15 – 0.40 ohm | 1 – 3 weeks | $3 – $6 | Excellent |
Prices reflect 2026 retail averages for pre-built replacement coils. Rebuildable wire spools cost significantly less per build.
Best Pick: SS316L Mesh Coils
For most vapers in 2026, SS316L mesh coils offer the best combination of flavor purity, versatility, and longevity. They work in both wattage and temperature control modes, deliver the cleanest taste of any wire material, and last 2-3 weeks on average. If you are upgrading from basic Kanthal coils, SS316L mesh is the single biggest improvement you can make to your vaping experience.
What Are Vape Coils and How Do They Work?
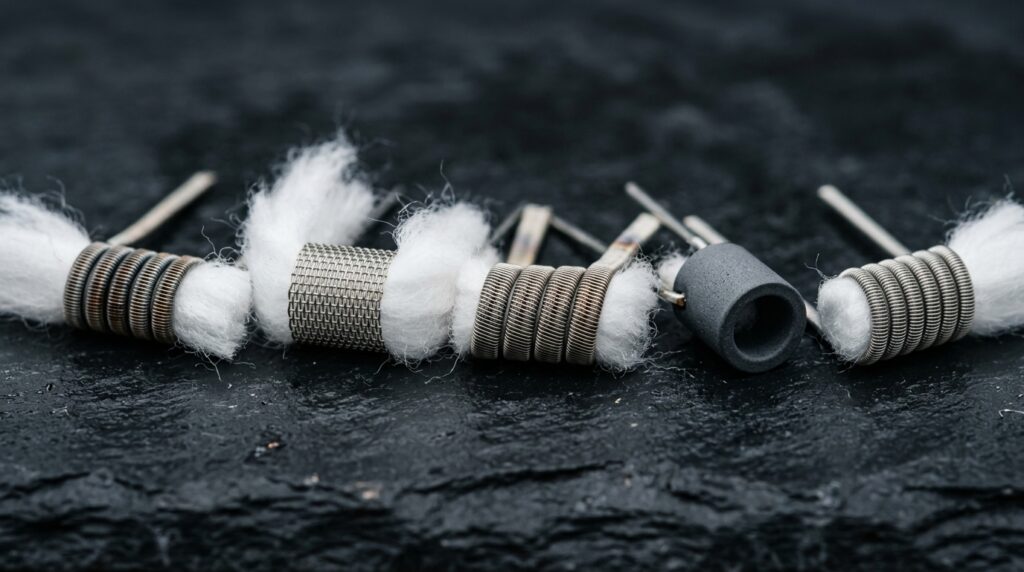
A vape coil is a small heating element inside your atomizer that turns e-liquid into vapor. It is the component you replace most often, and its design has the biggest impact on your vaping experience.
The Basic Anatomy of a Vape Coil
Every vape coil, regardless of type, contains the same core components working together:
1. The Wire (Heating Element)
A length of resistance wire — typically Kanthal, NiChrome, stainless steel, nickel, or mesh — wound into a coil shape. When electricity from your battery passes through this wire, its natural resistance converts electrical energy into heat. The wire heats up to temperatures between 200 and 600 degrees Fahrenheit (93 – 315 degrees Celsius), depending on your wattage setting.
2. The Wicking Material
Organic cotton (most common), cotton blend, or ceramic material threaded through the center of the wire coil. The wick draws e-liquid from the tank reservoir through capillary action — the same principle that makes a paper towel absorb a spill. The wick keeps a constant supply of liquid in contact with the hot wire.
3. The Housing/Base
A metal casing that holds the wire and wick assembly in place and connects to your tank or pod. The housing has contact points (usually a 510 pin or press-fit connection) that create the electrical circuit between your battery and the coil wire.
How the Vaporization Process Works
Here is the sequence that happens every time you press the fire button:
1. Battery fires: Your mod sends current through the coil wire at the wattage you have set.
2. Wire heats up: The resistance wire converts electrical energy to thermal energy. Lower resistance = more current = more heat (at the same voltage).
3. E-liquid vaporizes: The heated wire contacts saturated wicking material. The liquid at the surface of the wick reaches its boiling point and transitions from liquid to vapor (aerosol).
4. Wick re-saturates: As you inhale and pull vapor away, fresh e-liquid is drawn from the tank into the wick through capillary action, preparing for the next puff.
5. Cycle repeats: This happens dozens or hundreds of times per day, which is why wicks and wires eventually degrade and need replacing.
Why Coil Design Matters
The wire material, its gauge (thickness), the number of wraps, and the style of winding all determine:
Understanding these relationships helps you pick the right coil for your priorities, whether that is maximum flavor, cloud production, battery life, or cost savings.
Types of Vape Coils
Kanthal (FeCrAl)
Kanthal is the original vape coil wire material and remains the most widely used in 2026. It is an iron-chromium-aluminum alloy developed in Sweden.
Characteristics:
Why vapers choose Kanthal:
Kanthal is reliable, inexpensive, and available in every gauge from 22 AWG (thick, low resistance) to 32 AWG (thin, high resistance). It delivers consistent performance without any metallic taste. Most pre-built coils from major brands use Kanthal wire.
Limitations:
Kanthal cannot be used in temperature control mode because its resistance does not change predictably with temperature. If TC vaping interests you, look at stainless steel or nickel instead.
Best for: Beginners, wattage mode vapers, anyone who wants simple and dependable performance.
NiChrome (Ni80)
NiChrome is an alloy of nickel (80%) and chromium (20%). It has lower resistance per length than Kanthal, which makes it heat up faster.
Characteristics:
Why vapers choose NiChrome:
The fast ramp-up time means you get vapor almost instantly when you press the fire button. Many flavor chasers prefer Ni80 for this reason. It also has a slightly lower melting point, which some vapers say produces a warmer, more saturated flavor.
Limitations:
People with nickel allergies should avoid NiChrome wire entirely. The 80% nickel content can cause skin reactions or irritation in sensitive individuals.
Best for: Flavor chasers, vapers who want instant response, experienced builders.
Stainless Steel (SS316L)
Stainless steel is the most versatile coil wire material available. SS316L (the “L” stands for low carbon) is the specific grade used in vaping.
Characteristics:
Why vapers choose Stainless Steel:
SS316L is the only widely available wire that works in both wattage and TC modes. It has the cleanest flavor profile of any wire material — many vapers describe it as producing the “purest” taste. Its resistance changes with temperature in a predictable, linear way, making it the best choice for accurate temperature control.
Limitations:
Slightly more expensive than Kanthal or NiChrome. Also contains a small amount of nickel (10-14%), so it may not be suitable for people with severe nickel allergies, though the amount is far less than NiChrome.
Best for: TC vapers, flavor purists, advanced users who want one wire for every mode.
Nickel (Ni200)
Pure nickel wire was the first material used for temperature control vaping. It has extremely low resistance and is used exclusively in TC mode.
Characteristics:
Why vapers choose Nickel:
Ni200 has the most predictable temperature coefficient of resistance (TCR) of any coil wire, which means TC mods can control temperature with extreme precision. This prevents dry hits entirely when set up correctly.
Limitations:
Nickel wire is soft and difficult to work with. It cannot be used in wattage mode because its extremely low resistance can cause dangerous amperage draws. Heating nickel above certain temperatures may release harmful compounds, which is why TC mode (which limits temperature) is mandatory. Not suitable for anyone with nickel allergies.
Best for: Dedicated TC vapers who prioritize consistent temperature and dry-hit prevention.
Ceramic Coils
Ceramic coils replace the traditional cotton wick with a porous ceramic element. The wire is either embedded within the ceramic or wrapped around it.
Characteristics:
Why vapers choose Ceramic:
Ceramic wicks do not burn the way cotton does, so they last significantly longer. They deliver an exceptionally clean, pure flavor because ceramic is chemically inert. There is no “break-in” cotton taste with a new ceramic coil.
Limitations:
Ceramic coils are more expensive and less common than cotton-wicked alternatives. There were safety concerns raised in early studies about ceramic particle inhalation, though modern ceramic coils are manufactured to prevent particle shedding. Availability is more limited — fewer brands offer ceramic options compared to cotton-wicked coils.
Best for: Vapers prioritizing longevity and pure flavor, low-to-medium wattage vapers.
Mesh Coils
Mesh coils have become the dominant coil technology in 2026. Instead of a wound wire, they use a strip or sheet of thin metal with a mesh (perforated) pattern.
Characteristics:
Why vapers choose Mesh:
Mesh coils provide the largest surface area of any coil design. More surface area in contact with the wick means more e-liquid is vaporized simultaneously, which translates directly to better flavor and denser vapor production. The even heat distribution also means no hot spots — every part of the wick heats uniformly, reducing the chance of burnt hits.
Limitations:
Mesh coils consume more e-liquid than traditional round-wire coils because they vaporize more liquid per puff. They are primarily designed for direct-to-lung (DTL) vaping at higher wattages, so they are not ideal for tight mouth-to-lung (MTL) draws, though some MTL mesh coils now exist.
Best for: Flavor chasers, cloud chasers, DTL vapers, anyone upgrading from round-wire coils.
Mesh Coils vs Regular Coils: Head-to-Head Comparison
The shift from traditional round-wire coils to mesh has been the biggest change in coil technology over the past several years. Here is how they compare on every metric that matters.
| Feature | Mesh Coils | Regular (Round Wire) Coils |
|———|———–|—————————|
| Surface area | Very large (flat strip) | Smaller (wound wire) |
| Flavor quality | Excellent — more even extraction | Good — can have hot spots |
| Vapor production | Dense, thick clouds | Moderate clouds |
| Ramp-up time | Near-instant | 0.5 – 1.5 seconds |
| Heat distribution | Uniform across the strip | Uneven — hotter at center wraps |
| E-liquid consumption | Higher (more vapor per puff) | Lower |
| Coil longevity | 1 – 3 weeks | 1 – 2 weeks |
| Dry hit risk | Lower (even wicking) | Higher (hot spots can burn wick) |
| Wattage range | 40 – 120W typical | 15 – 100W typical |
| Best vaping style | DTL (direct-to-lung) | Both MTL and DTL |
| Price per coil | $3 – $6 | $2 – $5 |
The Verdict
For most vapers in 2026, mesh coils are the better choice. The improvement in flavor and vapor density is significant enough that nearly every major manufacturer now makes mesh their default coil option. The only scenarios where round-wire coils still make more sense are:
Pre-Built vs Rebuildable Coils
This is one of the most important decisions for intermediate and advanced vapers: do you use factory-made replacement coils, or do you build your own?
Pre-Built Coils (Replacement Heads)
Pre-built coils are factory-manufactured, disposable coil heads that you simply screw or press into your tank. When the coil burns out, you throw it away and install a new one.
Pros:
Cons:
Typical annual cost: A vaper who replaces coils every 2 weeks spends roughly $78 – $182 per year on pre-built coils.
Rebuildable Coils (RDA/RTA/RDTA)
Rebuildable atomizers allow you to install your own wire and cotton. You build the coil from a spool of wire, wick it with cotton, and mount it on a deck with post screws.
Types of rebuildable atomizers:
Pros:
Cons:
Typical annual cost: Wire ($10 – $20/year) + cotton ($5 – $15/year) = roughly $15 – $35 per year. That is a 75 – 85% savings over pre-built coils.
Which Should You Choose?
| Factor | Pre-Built | Rebuildable |
|——–|———–|————-|
| Experience level | Beginner to intermediate | Intermediate to advanced |
| Time investment | Minimal | Moderate (5-15 min per build) |
| Annual cost | $78 – $182 | $15 – $35 |
| Flavor ceiling | Very good | Excellent |
| Convenience | High | Moderate |
| Customization | None | Complete |
Recommendation: Start with pre-built coils. Once you understand how resistance, wattage, and wicking affect your vape, transition to a simple RTA like the Hellvape Dead Rabbit RTA or Geekvape Zeus X RTA to start building. The cost savings alone pay for the atomizer within a few months.
How to Choose the Right Coil for Your Device
Selecting the right coil comes down to matching four factors: your device, your vaping style, your e-liquid, and your priorities.
Step 1: Check Your Device Compatibility
Every tank and pod system is designed for specific coils. You cannot use a SMOK coil in a Vaporesso tank (with rare exceptions for cross-compatible coils).
Find your compatible coils:
Step 2: Match Coil Resistance to Your Vaping Style
| Vaping Style | Resistance Range | Wattage Range | E-Liquid Type |
|————-|—————–|—————|—————|
| MTL (Mouth-to-Lung) | 0.8 – 2.0 ohm | 8 – 25W | 50/50 or high-PG, nic salt |
| Restricted DTL | 0.4 – 0.8 ohm | 25 – 50W | 60/40 to 70/30 VG/PG |
| DTL (Direct-to-Lung) | 0.15 – 0.4 ohm | 40 – 120W | 70/30 to max VG |
| Cloud chasing | 0.05 – 0.20 ohm | 80 – 200W+ | Max VG |
Step 3: Consider Your E-Liquid
Your e-liquid’s VG/PG ratio and sweetener content directly affect which coil works best and how long it lasts.
Step 4: Prioritize What Matters Most to You
Resistance Levels Explained: Sub-Ohm vs Above-Ohm
Coil resistance is measured in ohms and is the single most important specification to understand. It determines how your coil performs and what kind of vaping experience you get.
What Is Resistance?
Resistance is how much a material opposes the flow of electrical current. In vaping terms:
This is governed by Ohm’s Law: V = I x R (Voltage = Current x Resistance). Your mod uses this relationship to deliver the right amount of power to your coil.
Sub-Ohm Coils (Below 1.0 Ohm)
Sub-ohm coils have a resistance below 1.0 ohm. Common values: 0.15, 0.2, 0.3, 0.4, 0.6 ohm.
Characteristics:
Best paired with: High-VG e-liquids (70/30 or higher), freebase nicotine (3 – 6 mg/mL), high-wattage mods with external batteries.
Above-Ohm Coils (1.0 Ohm and Higher)
Above-ohm coils have a resistance of 1.0 ohm or higher. Common values: 1.0, 1.2, 1.4, 1.8 ohm.
Characteristics:
Best paired with: 50/50 VG/PG e-liquids, nicotine salt e-liquids (20 – 50 mg/mL), pod systems and small pen-style devices.
The Sweet Spot: 0.4 – 0.6 Ohm
Many vapers in 2026 gravitate toward the 0.4 – 0.6 ohm range as a “best of both worlds” option. These coils offer:
If you are unsure where to start, a 0.4 or 0.6 ohm mesh coil at 25 – 40W is an excellent baseline.
How to Prime a New Coil (Step by Step)
Priming is the single most important thing you can do to protect a new coil. Skipping this step is the number one reason new coils burn out within hours.
Why Priming Matters
A new coil’s cotton wick is completely dry. If you fire the coil before the wick is fully saturated with e-liquid, the dry cotton will burn instantly. Burnt cotton cannot recover — the taste is ruined permanently, and you will need to replace the coil.
Step-by-Step Priming Instructions
Step 1: Apply E-Liquid to the Exposed Cotton
Look at your new coil head. You will see white cotton visible through the wick ports (the holes or slots on the sides of the coil). Apply 3 to 5 drops of e-liquid directly to each visible cotton area. Rotate the coil and apply drops to every wick port. For mesh coils with large ports, use 5 to 8 drops total.
Step 2: Saturate the Top
Put 2 to 3 drops of e-liquid down into the top opening of the coil (where vapor exits). This saturates the cotton from the inside. Do not flood it — you just want the cotton damp, not dripping.
Step 3: Install the Coil in Your Tank
Screw or press-fit the coil into your tank base. Make sure it is seated firmly and makes good contact.
Step 4: Fill Your Tank and Wait
Fill the tank completely with e-liquid. Then wait 5 to 10 minutes before taking your first puff. This waiting period is critical — it allows the e-liquid to fully saturate the wick through capillary action. Thicker, high-VG liquids may need up to 15 minutes.
Step 5: Break In at Low Wattage
Start at the lowest recommended wattage for your coil (check the range printed on the coil or packaging). Take 5 to 10 short puffs at this low wattage. Then increase by 5W increments every few puffs until you reach your preferred wattage.
Step 6: Find Your Optimal Wattage
Stay within the recommended wattage range printed on the coil. Going above the maximum can burn the wick even on a well-primed coil.
Priming Quick-Reference Table
| Coil Type | Drops to Apply | Wait Time | Break-In Puffs |
|———–|—————|———–|—————-|
| MTL (1.0+ ohm) | 3 – 4 drops | 5 minutes | 5 at low wattage |
| Sub-ohm round wire | 4 – 6 drops | 5 – 10 minutes | 8 – 10 at low wattage |
| Sub-ohm mesh | 5 – 8 drops | 10 – 15 minutes | 10 at low wattage |
| Ceramic | 3 – 5 drops | 10 minutes | 5 at low wattage |
Common Priming Mistakes to Avoid
Signs Your Coil Needs Replacing
Even with perfect priming and careful use, every coil eventually wears out. Here are the clear signals it is time for a new one.
1. Burnt or Off Taste
The most obvious sign. When your coil is done, every puff tastes acrid, charred, or chemically wrong. This happens because the cotton wick has degraded and is burning instead of vaporizing e-liquid.
2. Reduced Flavor
Before the fully burnt taste appears, you will notice a gradual decline in flavor quality. Juices that normally taste vibrant start tasting muted or dull. This is the early warning sign.
3. Gurgling Sounds
A failing coil cannot vaporize e-liquid efficiently, which causes liquid to pool and produce a gurgling or bubbling sound when you fire the device.
4. Reduced Vapor Production
If you are getting noticeably less vapor at the same wattage setting, the coil’s heating element is degraded. It can no longer reach the temperature needed for proper vaporization.
5. Dark or Discolored E-Liquid
Look at your tank. If the e-liquid has turned darker than when you filled it, the coil is leaching burnt residue into the juice. This is a sign of significant coil degradation.
6. Leaking
A worn coil may not seat properly or the o-rings may have degraded, causing e-liquid to leak from the base or airflow holes of your tank.
7. Frequent Dry Hits
If you get dry hits even though your tank is full and you are within the recommended wattage range, the wick is too degraded to absorb e-liquid properly.
Average Coil Lifespans
| Usage Level | E-Liquid Type | Expected Lifespan |
|————|—————|——————-|
| Light (< 2 mL/day) | Unflavored or low-sweet | 3 - 4 weeks || Light (< 2 mL/day) | Sweet/dessert flavors | 2 - 3 weeks || Moderate (2 - 5 mL/day) | Unflavored or low-sweet | 2 - 3 weeks || Moderate (2 - 5 mL/day) | Sweet/dessert flavors | 1 - 2 weeks || Heavy (5+ mL/day) | Any type | 3 - 7 days |
How to Extend Coil Life
Replacing coils less often saves money and hassle. These proven techniques can double or triple your coil’s lifespan.
1. Always Prime New Coils Properly
See the priming section above. A properly primed coil will last significantly longer than one that took even minor dry-hit damage during the first few puffs.
2. Avoid Chain Vaping
Take 15 – 30 second breaks between puffs. This gives the wick time to re-saturate with e-liquid. Chain vaping (rapid consecutive puffs) is the fastest way to burn out a coil because the wick cannot keep up.
3. Reduce Sweetener in Your E-Liquid
Sucralose and other sweeteners in e-liquid are the primary coil killer. They caramelize on the heating element and create a layer of dark residue (coil gunk) that degrades flavor and eventually burns. Switching to e-liquids with minimal or no added sweetener can extend coil life by 2 to 3 times.
4. Stay Within the Recommended Wattage Range
Every coil has a recommended wattage range printed on it or listed in the packaging. Running above that range overheats the wick and shortens coil life. Running below the range causes e-liquid to pool and flood.
5. Keep Your Tank Filled
Never let your tank run below one-quarter full. Low liquid levels mean the wick ports are exposed to air instead of e-liquid, which can cause partial dry hits that damage the cotton incrementally.
6. Clean Your Coils (When Possible)
For rebuildable coils, dry-burning and re-wicking extends wire life significantly. For some pre-built coils, soaking in warm water or grain alcohol can dissolve residue and buy you extra days. See our full guide: How to Clean Vape Coils.
7. Use Temperature Control Mode
TC mode prevents the coil from exceeding a set temperature, which eliminates the dry hits that damage wicks. This requires TC-compatible wire (stainless steel or nickel) and a mod that supports TC.
8. Lower Your Wattage Slightly
If you normally vape at 70W and the recommended range is 50 – 80W, try dropping to 60W. The small sacrifice in vapor production is often barely noticeable, but the reduced heat stress on the wick can add days to the coil’s life.
Top Coil Brands in 2026
SMOK
SMOK is the world’s largest vape manufacturer and produces the widest range of replacement coils on the market.
Key coil families:
What to know: SMOK coils are affordable and widely available, but quality control can be inconsistent. Some vapers report duds in a pack. Buying from authorized retailers reduces this risk.
Price range: $2 – $5 per coil | Shop SMOK Coils
Freemax
Freemax pioneered mesh coil technology and continues to be the benchmark for flavor performance.
Key coil families:
What to know: Freemax coils consistently win flavor comparisons in community reviews. Their tea fiber cotton wicking material absorbs e-liquid faster and lasts longer than standard organic cotton.
Price range: $3 – $6 per coil | Shop Freemax Coils
Vaporesso
Vaporesso is known for innovative coil technology, particularly their GTi and EUC (Eco Universal Coils) systems.
Key coil families:
What to know: Vaporesso’s EUC system is particularly cost-effective because you reuse the outer sleeve and only replace the inner coil. Their GTi mesh coils are consistently rated among the top performers for flavor.
Price range: $2 – $5 per coil | Shop Vaporesso Coils
GeekVape
GeekVape built its reputation on rebuildable atomizers (the Zeus RTA is legendary) and has expanded into excellent pre-built coils.
Key coil families:
What to know: GeekVape coils are known for consistent quality and longer-than-average lifespan. Their Zeus tank ecosystem is one of the most popular and widely supported in 2026.
Price range: $3 – $5 per coil | Shop GeekVape Coils
Uwell
Uwell focuses on simplicity and flavor. Their Caliburn pod system coils are among the best-selling worldwide.
Key coil families:
What to know: Uwell Caliburn coils are the gold standard for pod system performance. They offer remarkably good flavor for their size and price. The Crown series competes directly with Freemax for best sub-ohm tank flavor.
Price range: $2 – $5 per coil | Shop Uwell Coils
Price Guide by Coil Type (2026)
Understanding the true cost of vaping helps you budget and decide whether pre-built or rebuildable coils make more sense for your situation.
Pre-Built Coil Prices
| Coil Category | Price per Coil | Pack Size | Pack Price | Annual Cost* |
|————–|—————|———–|————|————-|
| Pod system coils (Caliburn, XROS) | $2 – $3 | 4 pack | $8 – $12 | $52 – $78 |
| MTL tank coils | $2 – $4 | 5 pack | $10 – $18 | $52 – $104 |
| Sub-ohm mesh coils (standard) | $3 – $5 | 3 – 5 pack | $10 – $20 | $78 – $130 |
| Sub-ohm mesh coils (premium) | $4 – $6 | 3 pack | $12 – $18 | $104 – $156 |
| Ceramic coils | $4 – $7 | 3 – 5 pack | $15 – $25 | $60 – $120** |
*Annual cost assumes bi-weekly coil replacement at moderate usage.
**Ceramic coils last longer, so fewer replacements per year.
Rebuildable Wire Prices
| Wire Material | Price per 25ft Spool | Builds per Spool | Cost per Build |
|————–|———————|——————-|—————-|
| Kanthal A1 | $4 – $8 | 30 – 50 | $0.10 – $0.25 |
| NiChrome Ni80 | $5 – $9 | 30 – 50 | $0.12 – $0.30 |
| SS316L | $6 – $10 | 30 – 50 | $0.15 – $0.33 |
| Ni200 | $5 – $8 | 30 – 50 | $0.12 – $0.27 |
| Mesh strips (10 pack) | $5 – $10 | 10 | $0.50 – $1.00 |
Add $5 – $15 per year for organic cotton. Total rebuildable cost: roughly $15 – $40 per year.
Cost Comparison Summary
| Option | Monthly Cost | Annual Cost | 5-Year Cost |
|——–|————-|————-|————-|
| Pre-built pod coils | $5 – $7 | $52 – $78 | $260 – $390 |
| Pre-built sub-ohm coils | $7 – $13 | $78 – $156 | $390 – $780 |
| Rebuildable (wire + cotton) | $1 – $3 | $15 – $40 | $75 – $200 |
The long-term savings from rebuildable coils are substantial. Even factoring in the initial $25 – $60 investment for an RTA and building tools, most vapers recoup the cost within 3 to 6 months.
For current prices and deals, check our price comparison page.
Want more recommendations delivered to your inbox? Subscribe to our weekly newsletter for the latest reviews, deals, and guides.
[MAILERLITE_FORM: embedded signup form]
Frequently Asked Questions About Vape Coils
How often should I change my vape coil?
Most vapers should change their coil every 1 to 3 weeks, depending on usage, e-liquid sweetness, and coil type. Heavy vapers using sweet e-liquids may need to change every 3 to 5 days. Light vapers using unflavored or lightly sweetened juice can get 3 to 4 weeks from a single coil. The key indicator is taste — when flavor quality drops noticeably, it is time for a new coil.
Can I use any coil in my vape?
No. Each tank or pod system is designed for specific coil heads. Using the wrong coil can result in poor contact, leaking, or no function at all. Always check your device manual or search for compatible coils by your tank name. Some coil families are cross-compatible (for example, the GeekVape Z coils work across multiple Zeus tanks), but this is the exception, not the rule.
Why does my new coil taste burnt?
The most likely reason is insufficient priming. If you installed a new coil and started vaping without saturating the wick first, the dry cotton burned. Unfortunately, a burnt coil cannot be fixed — you will need to install another new coil and prime it properly this time. Other causes include vaping above the recommended wattage or chain vaping without allowing the wick to re-saturate.
What is the difference between sub-ohm and regular coils?
Sub-ohm coils have a resistance below 1.0 ohm and are designed for higher-wattage, direct-to-lung vaping. They produce more vapor, more intense flavor, and use more e-liquid and battery power. Regular (above-ohm) coils are 1.0 ohm and above, designed for lower-wattage, mouth-to-lung vaping that more closely mimics smoking a cigarette. Neither is “better” — they serve different preferences. See our full resistance comparison section for details.
Are mesh coils better than regular coils?
For flavor and vapor production, yes. Mesh coils provide significantly larger heating surface area, which vaporizes more e-liquid evenly and produces richer flavor and denser clouds. However, they consume more e-liquid and are primarily suited for direct-to-lung vaping at moderate to high wattages. If you prefer tight, cigarette-like MTL draws, traditional round-wire coils may be a better fit. We break this down in our mesh vs regular comparison.
How do I know what wattage to use with my coil?
Check the recommended wattage range printed on the coil head or listed on the packaging. For example, a coil might say “Best 40 – 60W”. Start at the low end of that range and increase by 5W increments until you find the flavor and warmth you prefer. Going above the maximum can burn the wick and shorten coil life.
Can I clean and reuse vape coils?
Pre-built coils can sometimes be rinsed in warm water or soaked in grain alcohol to dissolve residue, which may extend their life by a few extra days. However, the cotton wick degrades over time and cannot be fully restored. For rebuildable coils, you can dry-burn the wire to remove gunk and then re-wick with fresh cotton — this is routine maintenance that extends wire life to months. For a step-by-step process, see How to Clean Vape Coils.
Why do my coils burn out so fast?
The three most common reasons for rapid coil degradation are: (1) sweet e-liquids — sucralose and other sweeteners caramelize on the coil and create residue buildup faster than any other factor; (2) chain vaping — not giving the wick enough time to re-saturate between puffs causes partial dry hits that damage the cotton incrementally; and (3) high wattage — running at or above the maximum recommended wattage puts more thermal stress on the wick. Addressing any of these factors can significantly extend coil life. See our coil life extension tips.
Is it bad to vape with a burnt coil?
Yes. A burnt coil produces unpleasant flavors and may release byproducts from degraded cotton, coil residue, and overheated e-liquid. While occasional use of a slightly degraded coil is unlikely to cause immediate harm, consistently vaping on a badly burnt coil means you are inhaling combustion byproducts from charred organic cotton, which defeats the purpose of choosing vaping over smoking. Replace burnt coils promptly.
What are the best coils for flavor?
In 2026, the consensus among experienced vapers is that Freemax 904L mesh coils and GeekVape Z Series mesh coils deliver the best flavor from pre-built options. For rebuildable setups, SS316L mesh strips on an RDA produce flavor that most pre-built coils cannot match. The key factors for maximum flavor are: mesh design (for surface area), stainless steel or 904L material (for clean taste), and the right wattage (start low and work up). See our brand comparison for specific recommendations.
Internal Link Plan
This pillar page should link outward to all coil-related content on vapingparts.com. As spoke articles are published, add contextual links from this page and from each spoke back to this pillar.
Links FROM This Pillar Page (add as articles are published)
| Anchor Text | Target URL | Section to Place Link |
|————-|———–|———————-|
| “our compatibility database” | /vape-replacement-coils/ | Choosing the Right Coil (Step 1) |
| “How to Clean Vape Coils” | /how-to-clean-vape-coils/ | Extend Coil Life (tip #6) + FAQ |
| “how long do vape coils last” | /how-long-do-vape-coils-last/ | Signs Coil Needs Replacing |
| “Freemax Mesh Pro Coils” | /freemax-mesh-pro-coils/ | Top Coil Brands > Freemax |
| “price comparison page” | /how-much-are-vape-coils/ | Price Guide section |
| “Types of Vape Coils” | /types-of-vape-coils/ | Types section intro |
| “Best Coils for Vape Mods” | /best-coils-vape-mods/ | Pre-Built vs Rebuildable |
| “Best Vape Tanks” (cross-site) | gotmyvape.com/best-vape-tanks/ | Choosing the Right Coil |
Links TO This Pillar Page (add to each spoke article)
Every coil-related article on vapingparts.com should include at least one contextual link back to this pillar using varied anchor text:
Cross-Site Links (gotmyvape.com)
| gotmyvape.com Article | Link TO This Page | Anchor Text |
|———————-|——————-|————-|
| Mesh Coil vs Regular Coil | /vape-coils-guide/ | “comprehensive coil guide” |
| Best Vape Tanks | /vape-coils-guide/ | “understanding vape coils” |
| Sub-Ohm Vaping Guide | /vape-coils-guide/ | “coil resistance explained” |
| Best Vape to Quit Smoking | /vape-coils-guide/ | “choosing the right coil” |
Rank Math Optimization Checklist
Last updated: March 2026
Author: VapingParts Editorial Team