Coils are the heart of your vaping device. These small but essential components are responsible for heating your e-liquid and transforming it into the flavorful vapor you inhale. Understanding when and how to replace your vape coils is one of the most important skills any vaper can develop. A fresh coil delivers crisp, clean flavor and satisfying vapor production, while a worn-out coil produces muted taste, burnt hits, and an overall unpleasant experience. Whether you are using a simple pod system, a pen-style device, or a powerful sub-ohm tank, coil maintenance applies to every vaper.
In this complete guide, we cover everything you need to know about vape coils: how they work, how to tell when they need replacing, the different types available, how to extend their lifespan, and expert tips for getting the best performance from every coil you install.
How Vape Coils Work
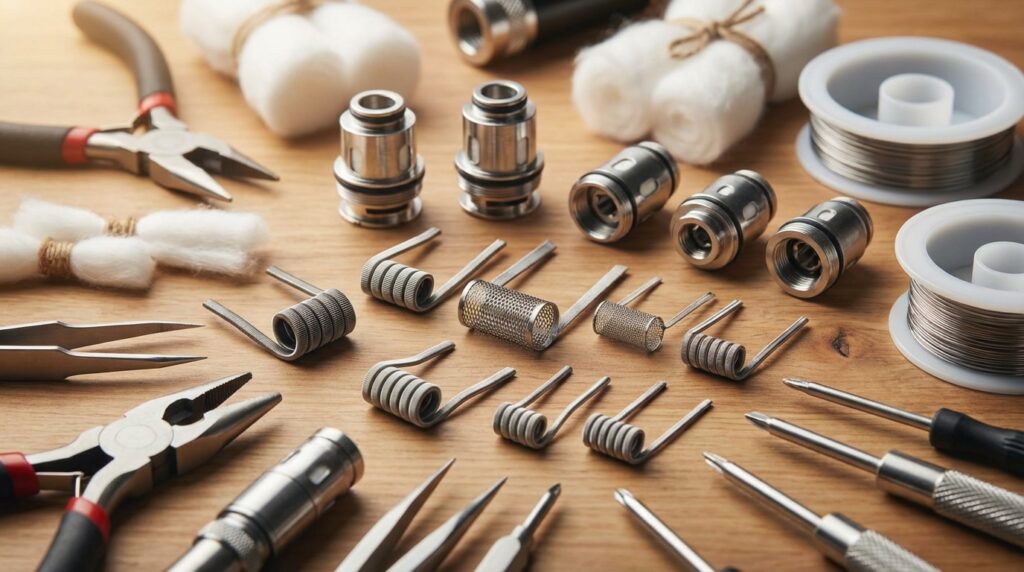
A vape coil is a small heating element made from a resistance wire, such as Kanthal, stainless steel, or nickel, wrapped around or woven through a wicking material, usually organic cotton. When you press the fire button or draw on your device, the battery sends electrical current through the wire, causing it to heat up rapidly. The heated wire vaporizes the e-liquid that has been absorbed by the wick, producing the vapor you inhale.
The resistance of the coil, measured in ohms, determines how much power is needed to heat it and how it performs. Lower resistance coils, typically below 1.0 ohm, are used in sub-ohm vaping and produce warmer vapor with larger clouds. Higher resistance coils, above 1.0 ohm, are common in mouth-to-lung devices and provide a cooler, tighter draw that more closely resembles smoking a traditional cigarette.
The wicking material plays an equally important role. Organic cotton is the most widely used wick because it absorbs e-liquid efficiently and delivers clean flavor. When the wick becomes saturated with residue from sweeteners, flavorings, and nicotine, it can no longer absorb liquid properly, leading to dry hits and burnt taste. This buildup is the primary reason coils need to be replaced.
I still cringe thinking about my first month with a vape. I went through three coil packs in about four weeks because I had no clue what I was doing. The worst was the time I forgot to prime a fresh coil, took a massive pull on my old Caliburn — I should have been using a device with better coil design like the Vaporesso XROS 4, and got the driest, most disgusting hit of my life. My wife was in the next room and asked if something was burning. That was the moment I decided to actually learn how coils work instead of just swapping them out and hoping for the best.
Signs Your Coil Needs Replacing
Knowing when to change your coil prevents unpleasant vaping experiences and protects your device. Here are the key warning signs to watch for:
- Burnt taste: This is the most obvious and unmistakable sign. If your vapor tastes charred, acrid, or like burnt cotton, your coil has reached the end of its life. A burnt coil cannot be fixed or cleaned back to usable condition. Replace it immediately.
- Reduced flavor: Before the fully burnt stage, you may notice that flavors taste muted, flat, or slightly off. Your favorite e-liquid might taste different than it did with a fresh coil. This gradual flavor loss indicates that residue is building up on the coil and wick, interfering with clean vaporization.
- Less vapor production: If you notice noticeably thinner clouds or reduced vapor density despite using the same settings and e-liquid, the coil is losing its heating efficiency. Residue buildup insulates the wire and prevents it from reaching optimal temperature.
- Gurgling sounds: Persistent gurgling or bubbling noises from your tank suggest the coil is not vaporizing liquid efficiently. Excess e-liquid is pooling around the coil instead of being properly heated. While occasional gurgling can be caused by other factors like overfilling, consistent gurgling with a coil that has been in use for a while usually means it is time for a replacement.
- Dark or discolored e-liquid: If you notice your e-liquid turning darker in the tank, particularly around the coil, this is a visual sign of gunk buildup. The residue from the coil is leaching back into your liquid, contaminating the flavor and reducing overall performance.
- Spitting or popping: When a coil is failing, it may spit hot liquid into the mouthpiece. This happens because the coil cannot consistently vaporize the liquid, causing droplets to pop and spray upward. Beyond being annoying, spitback can be uncomfortably hot.
- Increased wattage needed: If you find yourself gradually cranking up the wattage to get the same level of performance you had before, the coil is deteriorating. A fresh coil should perform well within its rated wattage range without needing constant adjustments.
How Long Do Vape Coils Last?
The typical lifespan of a vape coil ranges from one to three weeks, though this varies significantly based on several factors:
- Vaping frequency: A heavy vaper who takes hundreds of puffs per day will burn through coils much faster than someone who vapes casually throughout the day. If you chain-vape frequently, expect to replace coils closer to the one-week mark.
- E-liquid sweetness: This is the single biggest factor affecting coil longevity. E-liquids with high levels of sucralose and other sweeteners caramelize on the coil at high temperatures, creating a thick, dark residue that clogs the wick and coats the wire. Dessert flavors, candy flavors, and many fruit blends contain heavy sweeteners. If you vape sweet e-liquids exclusively, your coils may only last three to five days.
- Wattage settings: Running your coil at or near its maximum rated wattage generates more heat, which accelerates residue buildup and cotton degradation. Vaping at the lower to middle range of your coil’s recommended wattage extends its life noticeably.
- Coil quality: Premium coils from established manufacturers — such as GeekVape Z Series Coils, Smok RPM 3 Coils, and Horizon Falcon Replacement Coils — tend to use higher-quality wire and cotton, resulting in longer lifespan and more consistent performance. Budget or counterfeit coils often use inferior materials that degrade quickly.
- VG/PG ratio: High-VG e-liquids are thicker and take longer to saturate the wick. If your coil and wicking ports are small, thick liquid may not absorb fast enough, leading to dry hits that damage the cotton prematurely. Match your e-liquid viscosity to your coil’s design specifications.
- Nicotine type: Nicotine salt e-liquids generally cause less residue buildup than freebase nicotine, so they tend to be slightly easier on coils. However, nic salt liquids are often used in lower-powered devices with smaller coils, which can offset this advantage.
Types of Vape Coils
Understanding the different coil types helps you choose the right one for your vaping style and device.
Standard Round Wire Coils
The most basic coil design uses a single round wire wrapped into a coil shape around the cotton wick. Standard round wire coils are reliable, affordable, and widely available for most tanks and pod systems. They heat up quickly and provide solid flavor, though they offer less surface area than more advanced designs. If you are new to vaping or prefer a straightforward experience, standard coils are a dependable choice.
Mesh Coils
Mesh coils have largely replaced standard wire coils in modern tanks and pod systems. Instead of a wrapped wire, mesh coils use a thin, perforated metal sheet or strip that provides a much larger heating surface area. This results in more even heating, faster ramp-up times, better flavor reproduction, and improved vapor production. Mesh coils also tend to last slightly longer than standard coils because the heat is distributed more evenly, reducing hot spots that burn the cotton. Most major manufacturers now offer mesh coil options, and they have become the default choice for sub-ohm vaping.
Clapton Coils
Clapton coils feature a thinner wire tightly wrapped around a thicker core wire, similar to the winding on a guitar string. This design increases surface area and creates more texture for e-liquid to cling to, resulting in intensified flavor. Clapton coils require more power to heat due to their mass and are typically used in rebuildable atomizers or advanced sub-ohm tanks. They are not as common in pre-built coil heads but are popular among experienced vapers who build their own coils.
Ceramic Coils
Ceramic coils use a porous ceramic element as both the heating element and the wick. They offer exceptionally clean flavor and tend to last longer than cotton-wicked coils because ceramic does not burn or degrade the same way cotton does. However, ceramic coils have fallen out of mainstream popularity due to concerns about ceramic particles and the fact that they can be more difficult to prime properly. You may still find them in some older or niche devices.
Rebuildable Coils (RBA/RDA/RTA)
Rebuildable atomizers allow advanced users to install their own handmade coils using spools of resistance wire and loose cotton wicking. Rebuildable dripping atomizers (RDAs) require you to drip e-liquid directly onto the coil, while rebuildable tank atomizers (RTAs) feature a tank that feeds liquid to the wick automatically. Building your own coils offers the ultimate control over resistance, ramp-up time, flavor, and vapor production. It also saves significant money over time since wire and cotton are far cheaper than pre-built coil heads. However, rebuilding requires knowledge, tools, and patience, so it is best suited for experienced vapers. Browse our tanks and atomizers collection for rebuildable options, including the GeekVape Z Fli 2 Sub-Ohm Tank.
How to Replace a Vape Coil
Replacing a coil is straightforward, but following the correct process ensures the best results.
Step 1: Disassemble Your Tank
Empty any remaining e-liquid from your tank. Unscrew the base of the tank from the body. On most sub-ohm tanks, the coil threads into the base. On pod systems, the coil usually pushes or pulls out of the bottom of the pod.
Step 2: Remove the Old Coil
Unscrew or pull out the old coil and discard it. Take a moment to inspect the old coil. Heavy dark residue and discolored cotton confirm that it was time for a change.
Step 3: Prime the New Coil
This is the most critical step. Apply three to five drops of e-liquid directly onto the exposed cotton wicking ports on the sides and top of the new coil. Let the liquid soak in for a moment, then add another drop or two. The cotton should appear visibly saturated but not dripping. Priming prevents the dreaded dry burn that can ruin a new coil on its very first use.
Step 4: Install the New Coil
Thread or push the primed coil into position. Make sure it is seated firmly and the connections are secure. A loose coil can cause poor performance, misfires, or leaking.
Step 5: Reassemble and Fill
Reassemble your tank and fill it with e-liquid. Once filled, let the device sit for five to ten minutes before taking your first puff. This waiting period allows the cotton to fully saturate from the inside, ensuring even wicking throughout the coil.
Step 6: Break In the Coil
Start vaping at the lower end of the coil’s recommended wattage range. Take several gentle puffs before gradually increasing to your preferred wattage. This break-in period allows the cotton to settle and helps the coil last longer overall.
Here is something I wish someone had told me when I started: the juice you pick matters way more than the coil you buy. I was running a sweet watermelon candy flavor in my XROS 4 Mini and killing coils every four days. Switched to a simpler spearmint and suddenly the same coils were lasting two weeks. I am not exaggerating. My wife thought I was making it up until she saw the receipt from my usual coil order drop by half. If you vape dessert or candy flavors, just budget for more coils and accept it. Or switch to something lighter during the week and save the sweet stuff for weekends.
How to Make Your Coils Last Longer
A few simple habits can significantly extend the life of your coils, saving you money and ensuring a consistently good vaping experience:
- Always prime new coils: Never skip the priming step. Even a partial dry burn on a new coil damages the cotton and shortens its usable life. Take the extra minute to prime properly every time.
- Start at lower wattage: Begin at the low end of the recommended range and work your way up. Avoid firing at maximum wattage right from the start, as this puts unnecessary stress on a fresh coil.
- Keep your tank topped up: Let your e-liquid level drop too low and the wicking ports may become exposed, leading to dry hits that damage the cotton. Refill your tank when the liquid level reaches the top of the wicking ports.
- Avoid chain vaping: Taking rapid, consecutive puffs does not give the wick enough time to re-saturate between hits. Pause for at least a few seconds between puffs to let the cotton absorb more liquid.
- Choose less sweet e-liquids: If coil longevity is a priority for you, consider e-liquids with lower sweetener content. Tobacco, menthol, and lighter fruit flavors tend to be easier on coils than heavily sweetened dessert and candy profiles.
- Clean your tank regularly: When changing coils, rinse your tank with warm water to remove residue buildup. A clean tank environment helps a new coil perform at its best.
- Store your device upright: Keeping your tank upright when not in use prevents e-liquid from pooling around the coil and airflow openings, which reduces gurgling and flooding.
- Buy coils in bulk: Purchasing coil packs rather than singles saves money per coil and ensures you always have replacements on hand. Running a dying coil because you do not have a spare causes a poor experience and can damage your tank.
Coil Resistance and Vaping Style
The resistance of your coil directly affects your vaping experience. Understanding this relationship helps you choose the right coils for your preferences.
Sub-Ohm Coils (Below 1.0 Ohm)
Sub-ohm coils are designed for direct-lung (DL) vaping, where you inhale vapor directly into your lungs like taking a deep breath. These coils operate at higher wattages, produce warmer vapor, larger clouds, and more intense flavor. They work best with high-VG e-liquids and lower nicotine strengths (3mg to 6mg freebase). Sub-ohm coils are standard in box mods and larger tank setups.
Above-Ohm Coils (Above 1.0 Ohm)
Higher resistance coils are designed for mouth-to-lung (MTL) vaping, which mimics the draw of a traditional cigarette. You pull vapor into your mouth first, then inhale it into your lungs. These coils operate at lower wattages, produce less vapor, and deliver a tighter draw. They pair well with 50/50 PG/VG e-liquids and higher nicotine strengths, including nicotine salts. Most pod systems and starter kits use above-ohm coils.
Troubleshooting Common Coil Problems
Even with proper maintenance, you may encounter these common issues:
- Burnt taste on a new coil: You likely did not prime the coil thoroughly enough or did not wait long enough after filling before vaping. Unfortunately, once the cotton is burnt, the coil is ruined. Install a new one and prime it more carefully.
- Flooding and gurgling: If e-liquid is leaking into the airflow chamber, the coil may be loose, the wrong resistance for your settings, or the device may have been overfilled. Tighten the coil, check that the o-rings are intact, and blow gently through the mouthpiece to clear excess liquid.
- Muted flavor but no burnt taste: This often indicates the coil is nearing the end of its life but has not completely failed. You can continue using it, but flavor will only get worse. Replacing it sooner rather than later ensures a better experience.
- Coil lasting only a day or two: Check your e-liquid sweetener content. Extremely sweet e-liquids can kill a coil in one to two days. Also verify that you are not exceeding the coil’s recommended wattage range.
- Spitback and popping: This can occur if the coil is flooded, the wattage is too low for the coil’s resistance, or the device has been sitting unused for a while. Try increasing wattage slightly and taking a few quick primer puffs without inhaling to clear excess liquid.
Frequently Asked Questions
Can I clean and reuse a vape coil?
Pre-built coil heads are generally not designed to be cleaned and reused effectively. While you can rinse them in warm water and let them dry completely, the performance after cleaning is usually noticeably worse because the cotton has already degraded. Rebuildable coils, on the other hand, can be dry-burned to remove residue from the wire, and you can replace just the cotton for a fresh wick at a fraction of the cost of a new pre-built coil.
How do I know which coil is compatible with my device?
Each tank or pod system uses a specific coil family. Check your device’s user manual or the manufacturer’s website for compatible coil models. Common coil families include Smok RPM, Vaporesso GTX, VooPoo PnP, and GeekVape G Series. Many of these coil families are cross-compatible across multiple devices from the same manufacturer, which is convenient if you own more than one device.
What is the difference between mesh and regular coils?
Mesh coils use a flat, perforated metal strip instead of a wound wire. This gives them a larger heating surface area, which translates to faster heating, more even vaporization, better flavor, and slightly longer lifespan compared to standard round wire coils. Most modern tanks and pod systems have shifted to mesh coils as the default option due to these advantages.
Is it bad to vape on a burnt coil?
Yes. Vaping on a burnt coil is unpleasant and potentially harmful. The burnt cotton and residue produce harsh, acrid vapor that can irritate your throat and lungs. As soon as you detect a persistent burnt taste, stop using the coil and replace it. It is always better to carry a spare coil than to push a failing one past its limits.
Why do some coils last longer than others of the same type?
Even coils from the same pack can vary slightly in lifespan due to minor manufacturing differences in how tightly the cotton is packed and how the wire is wound. However, the biggest variable is always user behavior. Two people using the same coil with different e-liquids, wattage settings, and vaping frequency will see very different lifespans from identical coils.
Three years off cigarettes now and coil maintenance is honestly the thing that kept me from going back in those first shaky months. When your coils are fresh and your tank is clean, vaping feels effortless. When they are neglected, everything tastes terrible and you start eyeing the gas station counter. My advice to anyone new: prime your coils, do not chain vape like I did, and keep a spare coil in your wallet or bag. That one habit alone saved me from relapsing more than once.
Final Thoughts
Coil maintenance is one of the simplest yet most impactful aspects of vaping. A fresh, properly primed coil delivers the crisp flavor, satisfying vapor, and smooth throat hit that make vaping enjoyable. By learning to recognize the signs of a dying coil, following proper priming and break-in procedures, and adopting habits that extend coil life, you can save money and enjoy a consistently superior vaping experience.
Ready to stock up on coils for your device? Browse our full selection of tanks, atomizers, and replacement coils to find the right match. If you are looking to upgrade your entire setup, check out our starter kits and devices for the latest hardware from top brands. And if you want to explore new flavors that are easier on your coils, our e-juice collection has something for every palate.
Related Reading
Related Buying Guides
- Best Vape Tanks for Flavor 2026 — tanks with easy-access coil systems for simple maintenance
- Best Pod Systems 2026 — pod systems with replaceable coils for longer life
- Best Vape Starter Kits 2026 — kits with low-maintenance coil designs